Setup your store / department information in White Panel is easy, simply go to "Utilities" in the top drop down menu, click on store setup, which will lead you to this screen.
You may update / create new store information in this screen. Below is a list of stores / departments which has already setup in your White Panel. For Web Statistic and Chat information, we strongly suggest you seperate each Website to one store for clear separation between your web statistic data.
If you have just create your new White Panel Account, you may only see one store here which has the same name with your company (which is created based on the information provide by the setup form [see above]).
Free beta version has the maximum limitation of 1 store and 1 user account, whereas Standard Version comes with free and unlimited store.
Tips: At anytime, you may click on "Help" to access the onscreen help manual.
|

|
- Click on
 to update this store information. to update this store information.
- Note:
 means it do not allow for update. means it do not allow for update.
- Click on
 to delete this store information. to delete this store information.
- Note:
 means it do not allow for delete. means it do not allow for delete.
- Click on "Track" to enable your Website Statistic Tracking [see "Enable Website Tools" to learn how to install Website Tools into your website]
- Click on "Support" to enable your Website with Live Support Chat [see "Enable Website Tools" to learn how to install Website Tools into your website]
|
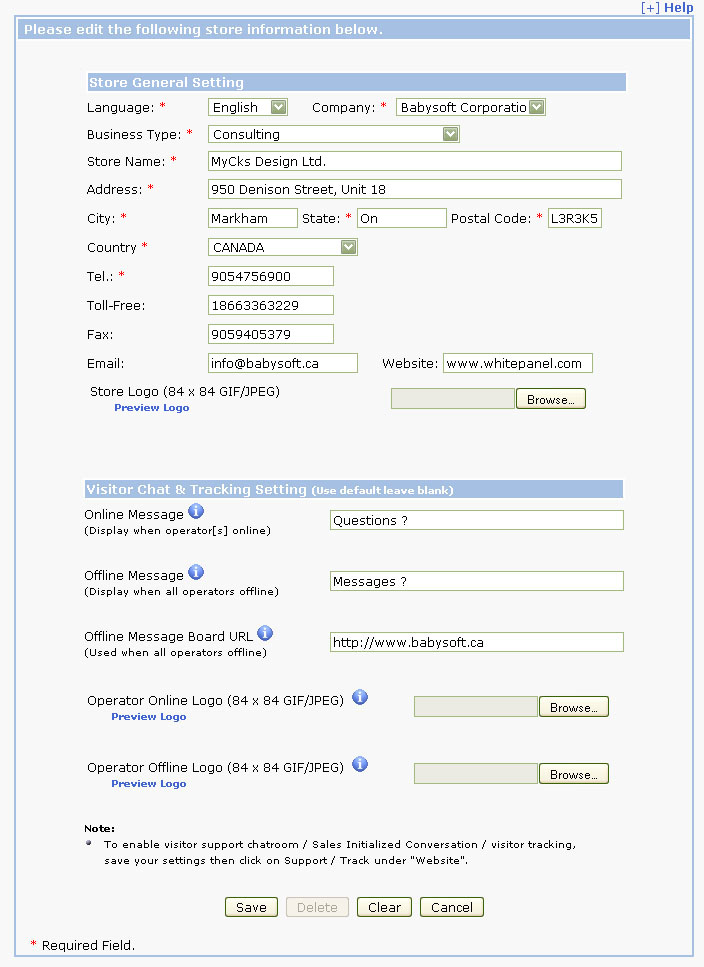
Whenever you wish to update your store information, or wish to create a new store, you will come to the following screen.
|
- * Indicate this is a required field
- Place As much information as possible
- Business Type is very important to place correctly, since we based on your business type to provide suitable updates for your White Panel.
- Email address is very important for us to contact you with any changes or update for your White Panel, it is required and must be correct
- Upload your Store Logo, which may be used in many places. Recommand Size: 84 (Width) x 84 (Height) in GIF/JPG format
- Online Message is used to customize the look in the "Visitor Chat Request box" on your website, when at least one of the operators is online. Default will use the phase: Ask Me Now !
- Offline Message is used to customize the look in the "Visitor Chat Request message box" when none of the operators is online. Default will use the phase: Message Me !
- Offline Message Board URL is used to customize where your visitor will be redirect to when all of your operators are offline and your visitor click on the chat request. Default will use White Panel Offline Email Message Board.
- Operator Online Logo is used to customize the image for the "Visitor Chat Request Box" in your websites when at least one of the operators is online. Click on browse to update your prefered image. Recommand Size: 84 (Width) x 84 (Height) in GIF/JPG format
- Operator Offline Logo is used to customize the image for the "Visitor Chat Request Message Box" in your websites when all of your operators is offline. Click on browse to update your prefered image. Recommand Size: 84 (Width) x 84 (Height) in GIF/JPG format
- Whenever you wish to submit the changes, simply click "Save". (To cancel all the changes, click Cancel will bring you back to the store list.)
|

|
|
Special Note:
- If the information you provide in the setup screen is accurated, you may skip to the "User Setup" in this document
- For all uploaded image, you may review it by clicking "Preview Logo". Blue link indicate it contains custom updated image, whereas black means no image have ever been uploaded.
- For discussion about how to install the Website Statistic Tracking and Live Support Chat into your website, please see "Enable Website Tools".
|
|


 to update this store information.
 means it do not allow for update.
 to delete this store information.
 means it do not allow for delete.